Competitive Learning: The Development of Feature Maps
Adapted from a notes by S. Dennis, 1997. Updated by J. Wiles 1998.
Introduction
In this chapter, we will look at an unsupervised architecture called the Self Organizing Map. The SOM consists of an input layer that is fully connected to an output layer of map nodes. When an input is presented the output nodes compete to represent the pattern. The node whose vector of weights is closest to the input pattern wins the competition. The winner and the units close to it (its neighbours) are then updated by moving their weight vectors closer to the input pattern. Because units near the winner are also moved, as training progresses units that are neighbours tend to come to represent similar patterns, while nodes far from each other in the map represent dissimilar patterns. If there are clusters of input patterns, then the points within a cluster will tend to activate the same output unit, while points from different clusters will be represented by separate units. The more dissimilar the clusters the further apart they will be mapped in the output layer.
The Self Organizing Map
The Activation Function
The Self Organizing Map is called a competitive algorithm because units compete to represent the input pattern. At any one time only one of the output units is on (set to one) and all other units are off (set to zero). The algorithm chooses the winning unit by comparing the current input pattern against the weight vector of each of the output units. The one that is closest wins. That is, unit i wins if:
|wi - p| < |wj - p| for all j
where wj is the weight vector of the jth unit and p is the current input vector.
The Learning Rule
Only the winning unit and its neighbours modify their weights. The change in the weight is determined by how close the input pattern is to the unit's weight vector, the learning rate and a neighbourhood function, which indicates how near the unit is to the unit that won the competition.
 ; wjk =
  N(i,j) (pk - wjk)
where wjk is the weight from unit k to unit j, is the learning rate, N(i,j) is the nearness of unit j and the winning unit i, and pk is the kth component of the input vector.
The neighbourhood function is greatest for units that are close together (especially the same unit) and decreases as the distance between the two units increases. It is important to realize that neighbourhood refers to the physical proximity of the units not how close their weight vectors are. In the original Som architecture, the neighbourhood is implemented using excitatory connections. In BrainWave, the neighbourhood is implemented directly by physical distance between units. That is, by the number of pixels between the units on the screen - so moving the units will affect how much one unit is affected when a nearby unit wins the competition for an input. The neighbourhood function in use in BrainWave is:
N(j, k) = 1/(1 + (d(j, k) / (202 * n2))
d(j, k) = (xj - xk)2 + (yj - yk)2
where xj is the x screen coordinate of unit j, yj is the y screen coordinate of unit j, 20 is the width in pixels of a unit (rescaling into unit widths) and n is a neighbourhood size parameter that can be altered to change the rate at which the function decreases.
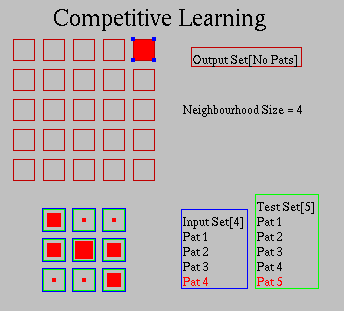
Figure 1. A SOM network, showing the 3x3 input units, 5x5 map (or output) units, pattern sets for input and test patterns, and output set with no patterns.
Orientation Maps
In this worksheet, you will be setting up and testing a SOM network for orientation selectivity.
Section 1. Setting up the network, pattern files and neighbourhood parameter
Open BrainWave and select the New Self-Organising Map Network. Set up the network as shown in the diagram.
1. Create the units and weights:
- Create an input layer of 3x3 units and group them, and an output layer of 5x5 units and group them.
- Using the weight tool, set up weights from the input to output layers.
The weights are initially zero, and are set to small random values using the Action "RandomizeWeights".
2. Create three pattern sets:
- Ungroup the input units, select them all, and using the "Set" tool, create a new pattern set and label it "Input Set". Add the four patterns corresponding to the oriented lines from the figure "Training patterns" to the Input Set.
- Again select the input units, and create a second pattern set. This set will be the test set. Add the five patterns from the figure labelled "Test patterns" to this second set.
- Ungroup the output units, select them all, and create a third set and label it "Output Set". Do not add any patterns to the output set - it is used purely to specify which units are part of the map layer.
- NB. The names "Input Set" and "Output Set" need to be spelled correctly, as they are important to the functioning of the SOM algorithm. The learning procedure automatically looks for a set labelled "Input Set" and the competition for the winning unit in the map layer takes into account all units specified by the set labelled "Output Set".
3. Create a parameter for the neighbourhood size
Using the "Value" tool, create a parameter and label it "Neighbourhood Size". Note the spelling and spacing between "Neighbourhood" and "Size". This parameter governs the amount of learning for neighbours of the winning node. The default value is 4.
In a traditional SOM network, every output unit would be connected to all its neighbouring units, for a given neighbourhood size. For a small network such as this one, every output unit would need to be connected to every other one, which would be slow to simulate. Instead, the BrainWave developers have used the Euclidean distance between units as a work around. Consequently the strength of activation between units depends on the distance in pixels between units. When setting up your Map layer, arrange the units symmetrically, and close to one another, as shown in Figure 1.
Question 1. How many input units, output units and weights are there in the network?
Question 2. How many additional weights would be required if all the output units were connected to one another?
Section 2. Test the implementation
Test the operation of your network (prior to learning) as follows:
1. Randomize the weights.
2. Activate an input pattern.
3. Using the Actions menu, select "feedforward". This command causes the map layer units to calculate their input.
4. Using the Actions menu, select the winning unit using "Select Winner".
5. Using the Actions menu, activate the neighbours of the winning unit:
Question 3. Test the effect of the neighbourhood size by changing the "Neighbourhood Size" parameter to 1, and reactivate the learning neighbourhood using "Activate Neighbours". Also test for size=8. Change it back to 4 for the next section. What changes occur when the "Neighbourhood Size" parameter is decreased, or increased, compared to the default value of 4?
6. Examine the weights into a map unit as follows:
Reset all units, and toggle one of the map units (it doesn't matter which one - select one at random). From the "Actions" menu, select "Examine Weights". The input units will show levels of activation corresponding to the weights. This pattern of activation shows the optimal input pattern to activate that unit.
Question 4. Test the effect of the proximity between output units, by moving our selected unit away from the other units. Activate the neighbours again. Describe what happens to the activation of the neighbours of the winning unit.
Section 3. Run a trial using learning
Test the location of patterns on the map during learning as follows:
Step 1. Record the map units before training:
For each of the patterns in the input and test sets, record which unit wins the competition by writing the number of the pattern (1 -4 for the Input patterns and 5-9 for the Test patterns) in the winning unit's square. Record your answers on the Figure labelled "Learning=0". Note that some map units may win the competition for more than one input pattern.
Step 2. Train the network for 4 steps:
Set the "Learn" action to 4, and press the learn button. Retest the input and test patterns and record the map response on the figure labelled "Learning=4".
Steps 3 & 4. Repeat the learning and testing and record the values for "Learning=8" then train the network for a long time (another 28 steps) and record the values for "Learning=36".
Question 5. Describe in words the changes that are shown in the map layer from the untrained network to the fully trained one.
Section 4. Observing the weights in the network
Test the weights into the map layer for different locations as follows:
Using the fully trained network, and the Actions menu command "Examine Weights", record the weights for each of the units in the map layer. For this exercise, you will be looking for the patterns in the weight values, and precise values are not required: Use a simple scheme, such as a dot for a low weight, cross for a medium weight, and coloured square for a high weight. (If you run out of time, it is sufficient to record the weights for 9 key points in the map.)
Question 6. What is the difference between the weights into the trained Map layer when the top left output unit is selected compared with the bottom right output unit. How do these differences generalize over the entire map?
Question 7. Explain why the test patterns (which have received no learning) occur in the positions that they do.
Section 5. Comparison across several trials
Compare your map layer solutions with 3 other students in the lab (or if you are completing this worksheet at home, randomize the weights and repeat Section 3).
Question 8. What differences occur in the maps created on different trials (i.e., given different initial random weights in the network)?
Question 9. What similarities would you expect all trained maps (from different initial weight sets) to show? Why?
Challenge Section (optional)
Question 10. What is a "twisted map"? How could such a map arise in the network? See if you can create a twisted map - run several trials from different starting weights and record what proportion results in a twisted map.
Figure 2. Training Patterns
Figure 3. Test Patterns
Figure 4. Map layer during learning
| Learning = 0
|
Learning = 4
|
Learning = 8
|
Learning = 36
|
Figure 5. Weights into the Map layer

